The Next Step

After knitting for a year I got bored with dish cloths and scarves and half mittens. I wanted a new challenge. Since I had taught myself off the internets, my stitches were top notch (or as good as they were going to get) but my pattern reading skills were the pits. So I picked an intermediate pattern from Red Heart (J27.0001-5K), bought some yarn and got cracking. Yay Socks!

Now, being two pages long and made for three different sizes, this pattern scared me for two reasons. One - I had to follow a pattern and wouldn't be able to fly by the seat of my pants into the sock knitting night; Two -  The pattern was two pages long and, after reading it through, I had no idea what I was in for. I started anyway, taking it one pattern section at a time. It turned out to, luckily, be a good strategy. The rib pattern was super easy and made up most of the sock. The tricky part ended up being understanding what the pattern wanted with regards to what needle was 'No 1' and what a psso was. (The internet helped me out with that one.) I got down to the heel where the pattern splits off onto only two needles. It recommends to place the unworked on stitches onto a stitch holder... which at the time I thought was a ploy to sell stitch holders... but seriously, buy one, so much less stress. Next, it was working in knit for the heel, which - after I figured out what a psso was - was rather easy. Picking up the stitches after the heel was done was awkward but manageable. Then it was rib pattern and knit from there on out, all the way to the toe knit.

Over all, I'd give sock making a 3 out of 5. It takes forever because you get bored of the rib pattern, but, at the end, I got a real sense of accomplishment. I made feet covers!  Rainbow feet covers.

-Andrea

The Half-Assed Hobbyist


Twisted Tradition

I don't often make family heritage inspired dinners. My Father's side of the family is from Germany and I've been able to make goose for Christmas dinner and rouladen, but I've not really made anything inherently French-Canadian (Mom's side). This thanksgiving, however, I thought I'd make a meat pie.

My grandmother used to make a traditional French-Canadian tourtiรจre years and years ago. (I don't personally remember but my Dad swears they were to die for.) So I thought I'd try my hand at it. I didn't have a recipe so I just made one up. A little twist on the traditional half-beef, half-pork tourtiรจre. 

Lamb tourtiรจre

Pastry

(Same as Apple Pie)

5 cups flour

2 tsp salt

1 lb shortening (LARD!!! Go French cooking!)

1 egg

2 TBSP white vinegar

Cold Water

Instructions: 

  1. Measure out flour and salt into a large bowl. Mix. 
  2. Cut in shortening until pea sized.
  3. Crack egg into a 1 cup liquid measure. Beat egg.  
  4. Add vinegar to beaten egg.
  5. Add cold water to egg and vinegar mixture until 1 cup measure.  Mix.
  6. Pour liquid mixture into flour mixture. Mix till a dough forms. (Add extra flour if dough is to sticky to handle)

Make enough for 3 pies (top and bottom).

Turkey.JPG

Meat Pie Filling

1 TBSP olive oil

1/2 medium white onion, chopped

3 celery sticks, chopped

2 tsp garlic, minced

1 lb ground Lamb (Frozen or fresh)

1/2 TBSP coarsely ground pepper

1 russet potato, cut into cube-ish shapes

1 medium zucchini, cut into cube-ish shapes

2 cups beef broth

2 - 3 TBSP flour

Instructions:

  1. Roll out pastry into a deep dish pie plate. Set aside.
  2. Prep all the ingredients. (Chop veg, defrost lamb, etc.)
  3. In a large skillet, heat oil over medium-high heat. Add onions and celery. Cook till onions are clear. 
  4. Add garlic. Cook for 2 minutes until fragrant. 
  5. Add ground lamb, breaking up lamb into peices. Cook till is lightly pink. Add ground pepper.
  6. Add potato and zucchini. Stir. Cook for 10 minutes or until potatoes begin to soften. 
  7. Pour broth into meat mixture. Bring to a boil. Reduce heat and simmer for about 20 minutes. 
  8. With a slotted spoon, transfer meat mixture to pie plate.
  9. Add flour to remaining liquid in the pan. Whisk together. Heat over medium high heat until gravy thickens, about 5 minutes.  
  10. Pour gravy over meat mixture in pie plate.  
  11. Roll out pastry for the pie top. Seal with water. Press top and bottom pie shells together.
  12. Bake at 400 for 45 minutes or until filling is bubbling and pastry is golden brown.  


That pie was amazing. I will be definitely making tourtiรจre again. (Christmas anyone?)

To be honest though, thanksgiving isn't quite right without a turkey, so we had that too. (Thanksgiving is my favourite food holiday, hands down.)

-Andrea

The Half-Assed Hobbyist

The Taming of the Aloe Vera

The Aloe Vera is possibly one on my most treasured possessions. When my grandfather moved into an assisted living complex he didn't want the fuss of taking a huge plant with him. So I got it instead.

Having this 40-year old family heirloom is surprisingly stressful. The reason being, because it's a living thing, it would be terrible for it to die. And since it has not been repotted since I've been alive, the plant is pretty crowded. Logistically, the only way to repot the plant would be to take a circular saw to the 1970s art deco ceramic pot. The other option, to transplant. I had never transplanted anything before so it was an experience. 

The Mama plant has two original shoots that make up most of the weight of the plant. From these sprouted 5 new growths that have been growing for 2 - 4 years. Since I was worried about transplanting in general, I picked the youngest three plants to be separated from the Mama plant. Logic being, that if they die, the main plant will still be intact, hopefully. So I went an bought three pots, with the help of my cousin Michelle. For the transplant medium, I mixed together half-seedling soil/half-miracle grow soil. (I'm still not sure what kind of soil the plant likes best, but it sprouted all those new babies after I topped the original pot up with seedling soil.) 

Then the hard part. Because the Mama plant is so totally root bound in that 1970s pot, I had to excavate the root system to get the baby plant roots loose enough to come out.  Lucky for me, with a lot of wiggling and poking with a teaspoon, tweedle dee and tweedle dum came out easy-peasy. They were both attached to the main plant by a soft base, which easily broke off, and they had short roots that hadn't had time to riggle into the knot of roots bound in the pot. Number One, however, was the oldest of the three plants and had very tangled roots. The base had also hardened so it was strong and woody and hard to move. With a lot of pulling however, I got it out with most of the roots intact.

So, all divided up, I got three little Aloe Veras and the Mama plant. Both my lady cousins got one, and our plant-friend Jon got one too. I couple months later I asked for pictures of the baby Aloe Veras. They seemed to be growing but the outer leaves on all the plants were browning. I'm thinking probably because the root system they had was too small to sustain the plant. But they will grow!

Also, not to disappoint the name, the Mama plant has been back at it, making two new sprouts for me to deal with later in their lives.  Sigh. 

 -Andrea

The Half-Assed Hobbyist


Collecting: The Forbidden Hobby

Collecting is a hobby that I enjoy immensely. Too much, actually. If I took collecting seriously, I would be so broke. Also, I would have no where to sleep because my entire apartment would be shelving units. I used to attempt to avoid collections of any kind, but after 25 years of life, inevitably, this uncontrollable desire for bunches of things had got me a couple times.

From a very young age I started collecting. My first real experience collecting started with Pogs (whoo the 90s!). Buying Slammers and trading Pogs with other kids at school. (Best marketing scheme, next to Apple, if you ask me. Printed cardboard and plastic. Jeeze.) It got to the point where I had so many that I had multiple Pog-tubes full. Did I ever play? Hah. No. But I wanted more and more. Eventually, the Pog phenomenon died (rather abruptly, whoo the 90s!) and my Pogs got put away, no longer welcome at school. That's when the Pokemon cards came in.... So Many Pokemon Cards. 

The Pog story pretty much encapsulates how my personality deals with collecting: My inner child wants All The Things. Not to use them; just to have them. Borderline hoarder maybe? Anyway, despite lack of funds, I managed to do some collecting when I was a kid. I was most proud of a Sailor Moon Manga collection (yes, I was a nerd girl with very few friends when I was a kid). I had almost given up on completing the collection when a high school friend gave me her copy of the first book, that I was missing. I still keep the books visible today. 

Which brings me to books. Books are a sore spot for collecting that the BF also shares with me (not alone, yay!). We have books upon books in shelves, in boxes, on side tables, etc. I have cookbooks, some from the 1940s. I have Agatha Christie novels, from the 70s. And children's fairytale books. When my grandfather moved, I helped my mom and uncle pack up his house. Since I was the only grandchild to pitch in, I got to pick what I wanted from the house. When I was little, my grandmother had a fairytale book that I adored. The book was thick and rectangular and full of wavy colourful pages. It turned out that there were many of these books around the house, from collections or just singletons. I took them all. Even now, if I see an old fairytale book, I get that itching feeling. 

Another heirloom set I got during those 3 days of packing up Grandpa's house was my grandmother's china collection. Old Country Rose, made in London, England. A really popular set, all original from 1962. She never got to finish the collection when she was alive so I visit antique shops whenever I travel in hopes of finding some original tea plates or the mythical coffee pot, to complete the collection.

Those are the collections I'm proud of. The collections I think about and get a warm fuzzy feeling of accomplishment. I do have two secret collections though... that are shameful. (No, not porn.)

Over the years, I seem to have collected a lot of kitchen appliances. Specifically blenders, of which there are currently 4 sets in my storage closet. The even more crazy thing is I used to have 5 blender sets. I didn't buy all these blenders myself, I just didn't ever stop asking for them. So I ended up with the 5 blenders: the Ninja (my favourite), the Food Processor, the Smoothie Maker (complete with smoothie cups), the regular glass blend-all, and the micro-food processor (most useful thing I own). The regular glass blend-all went to the upstairs neighbours, then Christmas happened. I swear, they are breeding in the closet. 

The last collection of shame is my fabric collection. I love sewing. Unfortunately, this love comes with a closeted tendency towards hoarding. Fellow sew-ers will sympathize (while everyone else thinks we're crazy). Sometimes inspiration hits and I have to have that fabric. Despite not having a project to use it for... or anymore room in the fabric closet. One day I will whittle down that pile. Hopefully. 

Collecting for me is the Forbidden Hobby. I can't engage in it too much for fear of being claimed by the obsessive personality that underpins me. But from the collections I do have (of which there are more than I thought), I get the pleasure of perusing them and soaking in the nostalgia of making them.

 -Andrea

The Half-Assed Hobbyist

The Hunt for Red Raspberries

Summer 2013 I was unemployed. Again. So I spent most of the summer working on my hobbies. One hobby I promised myself I would pick up was canning. 

Unlike making apple pie or cooking, I had no previous experience with making jam. I think my family must have made sour cherry jelly when I was very very little but I was definitely to young to help with the process. I just remember the result: sugary sweet pinky coloured goo.  

So this past summer, the BF and I went berry picking at Horse Hill Berry Farm which, despite being late in the season, had buckets and buckets of raspberries left. We picked 13 pounds in 3 hours. It was epic. A train even honked at me! We picked three kinds of berries: Red Bounty (good for jams because the bushes are loaded with berries), Mammoth (basically really huge berries), and K-81-6 (best tasting of the bunch). After, we headed home to gorge ourselves on delicious raspberries.   

August 2013 at Horse Hill Berry Farm. I caught the attention of the train engineer and he gave me a honk =D

Now, having never canned jam before I read up on proper handling and preparing (having a background in Food Science, this was a little terrifying). There is a lot of misinformation out there and most of it is a bit scary. Basically though, pre-preperation is key. To properly can jam, everything has to be hot hot hot. The jars need to be boiled to sterilize them; the jam needs to be boiled; all utensils need to be clean; and a boiling water bath needs to be used to seal the jars.

So, first step, other than the obvious 'get raspberries', is to get jars (I used 250ml), sugar and pectin. I got all these from Canadian Tire, which is super cheap compared to getting the same stuff from a grocery store. Like 50% less. Crazy.

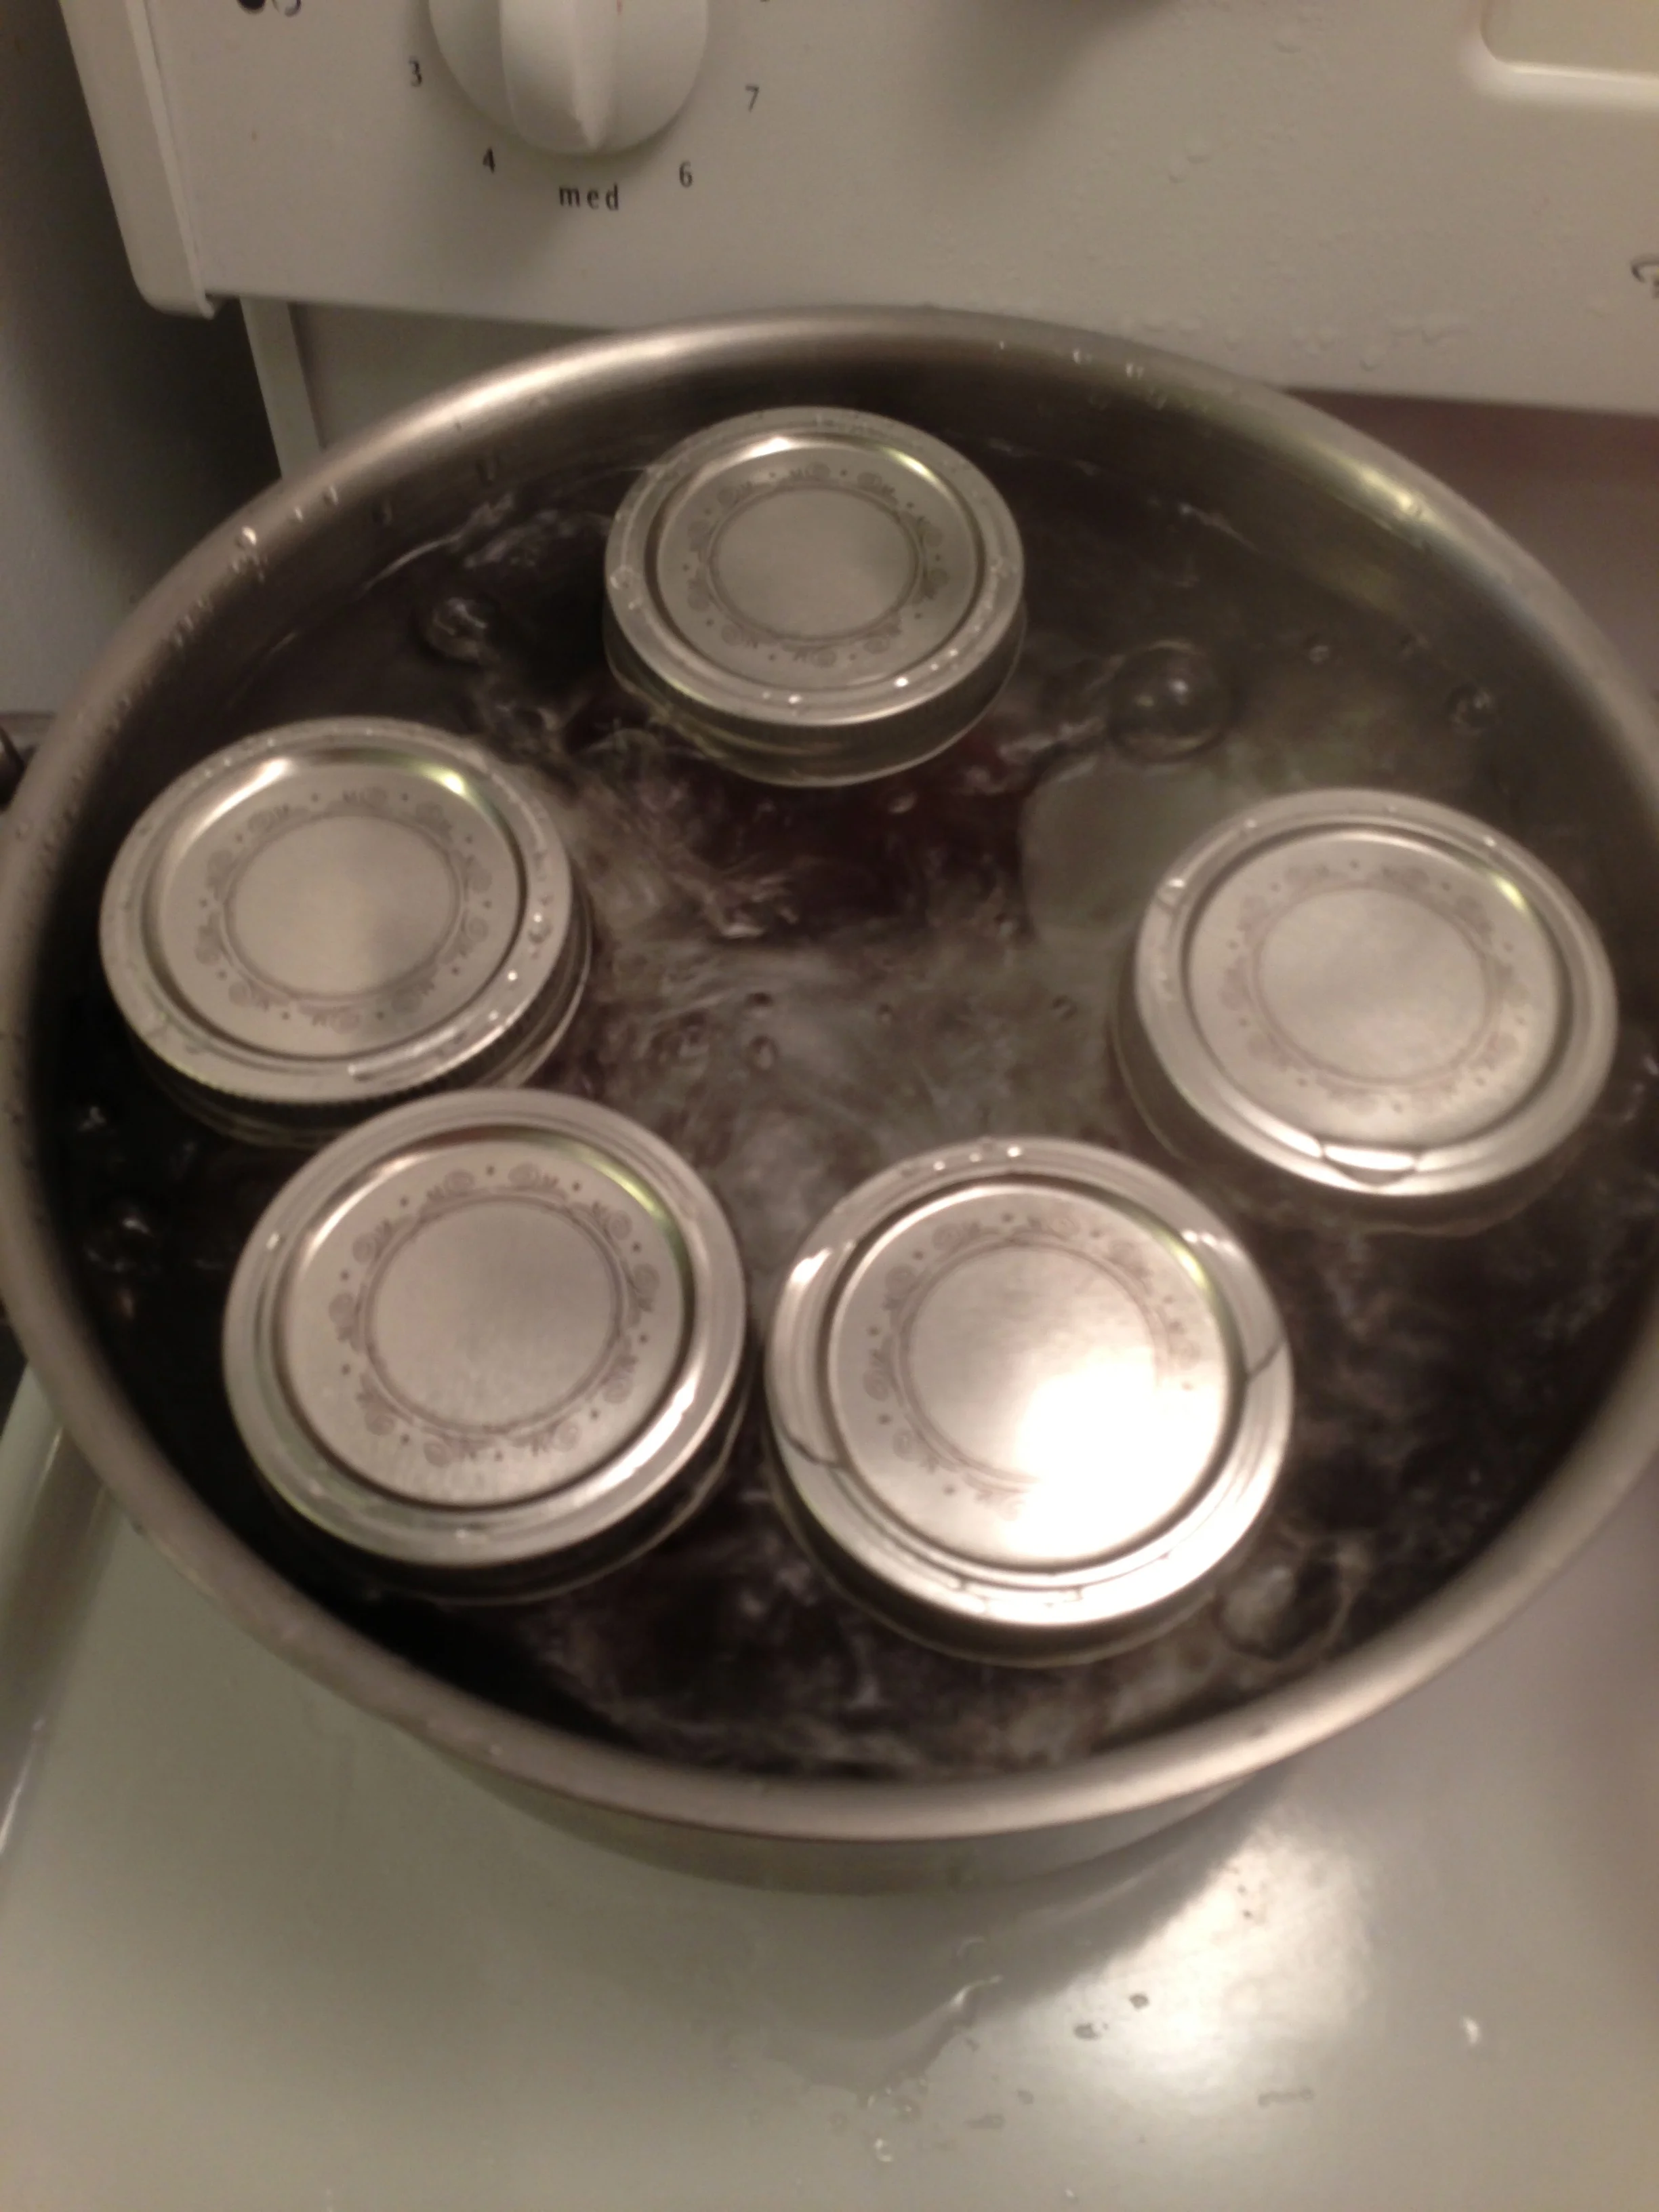
Second step, I washed the jars, lids and screw bands in hot soapy water. After everything was rinsed, the glass jars were placed into a big pot filled with water (cover jars with at least 1 inch water above the top of the jar) and brought to a boil. I placed the lids in a saucepan and heated the water. Not to hot though, temperate enough that you can to put your fingers in the water. I dried the screw bands (kinda... the picture makes them look wet, hah) and set them up so they are easily accessible. 

Now that the jars were all prepped, I washed all the utensils in hot soapy water as well. I used a ladle, a funnel and a plastic knife. Next, ingredient prep! I bought Bernardin Fruit Pectin. There are many different kinds of pectin you can buy or you can use the natural pectin in the fruit itself. That process takes longer and as a first time canner I wanted to follow some hard core instructions. I finished the rest of the ingredient prep, measuring out the sugar (7 cups a batch... Mmmm diabetes) and the margarine (to cut down on the foam that rises to the top of the jam after the second boil). Last but not least, mashing up all the raspberries a cup at a time. 

That was all the prep! Then it was on to making molten fruit sugar! Bringing the raspberries, margarine and pectin to a boil took a lot longer than I thought, around 15 minutes. And by boil, I mean a rolling boil. Ferocious bubbling, melt your skin off, boil. Carefully, I added the sugar and brought it back up to a boil. Stirred for a minute; then took the pot off the heat. 

Now, the rest is all timing. Everything needs to be hot hot hot. I used my life-saving jar grabber and fancy funnel to fill the jars with a ladle, leaving a 1/4 inch head space (extra room at the top of the jar incase the jam expands. You don't want it oozing out of the jar and ruining the seal). Then, after cleaning the rim of the jar with a damp paper towel, I put the lid on the jar (don't touch the underside!), and used a screw band, tightened only till fingertip tight. Fingertip tight means that as soon as you feel resistance to being tightened more, leave it. The screw band is supposed to keep the lid on BUT not too tightly because the air trapped inside the jar needs to be able to sneak out when you boil it. That's how you get a seal. After that, it was back into the boiling water. And repeat. 

After all the jars were filled, I boiled them for 15 minutes. This is to bring the jam's temperature past the point that any mirco-organism could survive. Now, the internets doesn't always agree on boiling jars. Also, my Oma doesn't ever process her marmalade. But, a curse of my degree, I would rather be sure that nothing could survive to make anyone sick than not process and be anxious forever. Depending on the altitude, the timing differs. Since I'm above sea level by over 1000m I had to add an extra 5 minutes onto the base 10 minutes. 

The rest is easy as watching a pot boil. After the allotted time, I took out the jars, keeping them level, and set them to cool for 24 hours (some people say 12 hours is fine, but meh).  About 3 minutes after I took the jars out, a faint popping noise came from each of them. Success! They had all sealed! 

It was a good first experience canning. I definitely had to go buy a bigger pot after because it was hard to keep an inch of water covering the jars while they were boiling. I flooded my stove pretty expertly. But hey, I don't call myself the Half-Assed Hobbyist for nothing. 

-Andrea

Th Half-Assed Hobbyist